Introduction to Digispark
You can download our e-book ‘Learn Arduino’ from this link
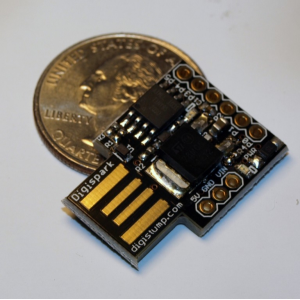
In today’s blog post we’ll analyze one of the smallest and most practical boards out there. The Digispark board. It’s size, including the USB port, is 25mm x 18mm (so tiny)!! This little board is powered by an ATTINY85 chip and clocked to 16.5Mhz. For conveniece, it has a built in USB port and can be plugged into a your computer without cables or adapters. Now that’s pretty awesome! It is powered by either the USB port, from the +5v pin with regulated 5v or from VIN pin if unregulated. The VIN pin supports from 7v to 35v although less than 12v is recommended by the manufecturer.
The board has 6 I/O pins, 3 of which support PWM and 4 support ADC, making this board really interesting for small to medium sized projects. There are 2 LED indicators, 1 indicating power, the other is connected to pin 0 (or pin 1 depending on the version).

Using this board is fairly easy, it’s like using any other Arduino with some small differences. Basically the main difference is the processor. The ATTINY85 is a little different than the ATMEGA328, which is why certain libraries won’t work. Particularly one cannot use the Serial library which makes things a little bit harder to debug. But not all is lost. Developers at Digispark created a driver with a simple UI that can act as a serial monitor and read data from the controller.
Digispark’s wiki page hosted is very helpful in almost all aspects of this board, from installation to troubleshooting libraries etc… The wiki can be accessed at https://digistump.com/wiki/digispark . Did I mention that it can be programmed as a normal Arduino through the same IDE? Yep it can, and with minimal change. So how to get started with digispark? First make sure you have the latest Arduino IDE installed, then navigate to https://digistump.com/wiki/digispark/tutorials/connecting and download the Digispark drivers. Follow the instructions to install the driver for your OS.
Install it, I’ll wait here… 🙂
The driver consists of some examples which you may try and should work out of the box, to test your installation. These examples are found under File > Examples. If you feel a little adventurous you can start off to program your little Digispark yourself with the ultimate hello world sketch, the blinking LED 😛
First check the board settings. Go to Tools > Boards and choose the Digispark Default 16.5Mhz. Now paste this little sketch. int ledPin = 0; //The LED pin. Could be attached to pin 1
void setup() {

  pinMode(ledPin,OUTPUT); //setting the pin mode to Output

}

void loop() {

  digitalWrite(ledPin,HIGH); //Switching the LED on
  delay(250); // wait 250 ms
  digitalWrite(ledPin,LOW); // switching the LED off
  delay(250); // wait 250 ms

}
This should blink the LED on and off every 250 ms.
To upload the sketch, click upload BEFORE inserting the Digispark into the USB port. In the console part of the screen, it will output compiling info and if compilation was successful it will ask you to plug in the digispark. Plug it in and the rest should be handled automatically. This is one of the differences between digispark and the standard Arduino boards. You may notice that the board takes around 5 seconds to boot up, this is the waiting time to check if any uploads are in progress. After a few seconds the upload should be complete and… TAA DAA… LED starts blinking (hopefully. If otherwise, try changing the LED pin number to 1 in the sketch).
You can buy Digispark from (ebay)
Thanks for you interest and as always, Happy building 🙂

