Arduino Bluetooth Tutorial HC-05
You can download our e-book ‘Learn Arduino’ from this link
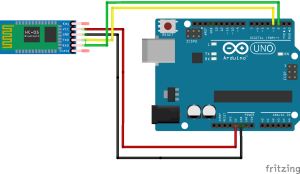
Can Arduino control a Bluetooth device? Of course, the most common devices are the HC-05 and HC-06. The difference between the two is that the HC-05 can act as a slave and as a master, while the HC-06 can act just as a slave. So don’t bother with the HC-06 🙂 In this tutorial we will set up a slave HC-05 Bluetooth device and pair it with an Android phone. Then using a Bluetooth terminal found on the Android Play Store, we will be able to send commands to the Arduino and receive confirmation. We will try to switch the builtin LED on pin 13, on and off.
Hardware needed


And finally the source code 🙂
#include <SoftwareSerial.h>

SoftwareSerial mySerial(3, 2); // RX, TX

void setup() {
  // Open serial communications with the PC
  Serial.begin(57600);
  while (!Serial) {
    ; // wait for serial port
  }

  pinMode(13,OUTPUT);

  // set the data rate for the bluetooth communication port
  mySerial.begin(38400);

}

void loop() {
  if (mySerial.available()) {
    char x = mySerial.read();
    Serial.write(x);
    if (x == 'H') {
      digitalWrite(13,HIGH);
      mySerial.write("Ok - Turning On");
    }
    else if (x == 'L') {
      digitalWrite(13,LOW);
       mySerial.write("Ok - Turning Off");
    }
    else  mySerial.write("Error");
  }
  if (Serial.available()) {
    mySerial.write(Serial.read());
  }
}
Now install a Bluetooth terminal on your phone and connect to the hc-05 module.
Once connected try sending ‘H’ to switch the LED on and ‘L’ to switch it off. Anything else you send will return an error, kind of.


[* Shield plugin marked this comment as “spam”. Reason: Failed GASP Bot Filter Test (comment token failure) *]
HC-05 works at 3.3V, not 5V. In your diagram, even if it works, the module will stop working soon. You need to use a voltage level shifter in the TX/TX lines.