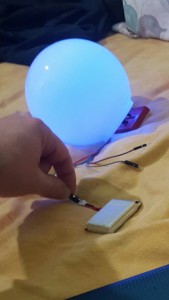
A Smart Night Lamp for Kids
You can download our e-book ‘Learn Arduino from Scratch’ from this link
Few weeks ago I heard my nephew (aged 7) complaining of the dark at night. Basically he was afraid 🙂 So I decided to put knowledge into practice and build a night lamp for kids. Since the project was intended for kids, I thought of making the lamp change color every now and then. It should also be sensitive to light so that if the room is well lit, the lamp would remain off.
For this project Arduino Uno was used.You can use any other Arduino instead, and all should work fine.
Hardware:
- 1x Arduino (ebay)
- Some Jumper wires (ebay)
- 1x Half Size Breadboard (ebay)
- 1x Bright RGB Cathode LED (ebay)
- 1x Photo Resistor (ebay)
- 2x 220 Ohm Resistors (ebay)
- 1x 330 Ohm Resistor (ebay)
- 1x 10K Ohm Resistor (ebay)
Schematic

So basically the idea was that as a first, the lamp should be switched on only when the photo-resistor reading goes below a certain threshold, meaning that the ambient light went down considerably; secondly the lamp should change color at certain intervals. That is why an RGB LED was used.
The Photo Resistor or Light Dependent Resistor (LDR) is a resistor which decreases its resistance when exposed to light. This means that the more light the LDR receives the more current passes through it and through the Arduino pin which is then read by the Arduino. The Resistor connected in series with the LDR serves to limit or increase the range of the LDR sensitivity to light. A 10kOhm resistor is a good choice to read ambient light but not if the LDR is exposed to direct sunlight, and also not good for low light conditions because the values saturate rapidly in these extremes.
The code is self explanatory but I will outline some points here. Remember that this sketch needs to do 2 things, first check the LDR for ambient brightness, if the ambient brightness is less than the ‘darkThreshold’ variable (which obviously you can tweak) the LED is lit by choosing 3 random values for the Red, Green and Blue pins. The ambient light is read every second so for example if the suddenly you switch on the room’s main light the LED would turn off almost instantly. The LED color changes every ‘changeColorTime’ in milliseconds. By default it is set to 900000 milliseconds equivalent to 15 minutes (as usual feel free to play with these figures).
Happy Sleeping 😀
Source Code
int photoSensorPin = A0;
int redLedPin = 3;
int greenLedPin = 5;
int blueLedPin = 6;
int redLedVal = 0;
int greenLedVal = 0;
int blueLedVal = 0;
boolean isLedOn = false;

int brightness = 1023;
int darkThreshold = 50;
int changeColorTime = 900000;

long lastUpdate=0;

void setup()
{
randomSeed(analogRead(1));
}

void loop()
{
getBrightness();
if (brightness<darkThreshold){ if (!isLedOn) { LedOn(); isLedOn = true; lastUpdate = millis(); } else if (millis()>lastUpdate+changeColorTime)
{
LedOn();
isLedOn = true;
lastUpdate = millis();
}
}
else {
LedOff();
isLedOn = false;
}

delay(1000);
}

int getBrightness()
{
brightness = analogRead(photoSensorPin);
return brightness;
}

void LedOn()
{
redLedVal = random(1,128);
greenLedVal = random(1,128);
blueLedVal = random(1,128);

analogWrite(redLedPin,redLedVal);
analogWrite(greenLedPin,greenLedVal);
analogWrite(blueLedPin,blueLedVal);
}

void LedOff(){

analogWrite(redLedPin,0);
analogWrite(greenLedPin,0);
analogWrite(blueLedPin,0);
}
Order your Smart Night Lamp for Kids DIY Kit here!!


Very nice project.But the thing is I am complicated in building a circuit using bread board.Is there any other option to build a circuit or can you please present the circuit connection pic in detail??
Great project, congratulation! 🙂 But I have one question: where did you get the shade from. It’s not included in the DYI-Kit but I need it absolutely. 😉 Best regards, Janine
Yes, I’m having the same problem Rakshitha. Please assists us even with picture.
Hi Janine,
Sorry for the super late reply but you were caught up in the spam filter for some reason.
Anyway, the was lying in the garage, in a box full of scrap so it’s basically recycled and I have no idea where I got it from 🙂
I like project but I got a coding message:
can you help?
exit status 1
‘isLedOff’ was not declared in this scope
Hi , nice project but thing is that i didn’t get how exactly it works. can u please share video how exactly it works??ASAP!!!
[* Shield plugin marked this comment as “spam”. Reason: Failed GASP Bot Filter Test (checkbox) *]
Since the project was intended for kids, I thought of making the lamp change color every now and then.
I am just about to start this project and am new to Arduino.
I am just firstly wondering if there is any possible way I can just use my 220R, 10K, 4.7K and 1K resistors from my Beginner kit for Arduino, instead of using the 330 Resistor?
and secondly, is it possible for me to use my Ambient Light Sensor instead of a photo resistor?
Please let me know if you think this is possible.
Thanks,
– Keenan
Hi there, glad you are interested in this project. So about you question regarding resistors you can use three 1K resistors in parallel to get a resultant resistance of 333 Ohm.
Regarding the Ambient Light Sensor, yes you can use it of course but you will need to modify the code and also the circuit. If you can tell us which ALS are you using we could help you out with that.