Plants Monitor – Arduino Soil Moisture Sensor
You can download our e-book ‘Learn Arduino’ from this link
Do you have a plant in the living room which you often forget to water? I know, I know you often forget about it. So before it becomes yellow and dries more than the Sahhara, follow this tutorial and build a little soil monitoring project. The Plants Monitor will help you remember to water your little plant by flashing an LED (you can add a buzzer but thats super annoying).
Parts needed:
- Arduino (ebay)
(almost any Arduino will do, I am using Uno)
- RGB LED (ebay)
- 2x 330 ohm resistor (ebay)
- moisture sensor with regulator (ebay)
- some jumper wires (ebay)
Background
This circuit works on a very simple principle, which is conductivity of water. As you may already know water is a conductor of electricity which means if we put 2 electrodes in water and apply a voltage to one of them, we should read some voltage on the other electrode. The same goes with soil. Soil has an amount of water which can be measured when a current passes through it. To accomplish this, we need a soil moisture sensor with regulator, and it costs less than $2. This sensor (at least my sensor) will give us a value, from 200 (most wet) to 1005 (most dry) which represents the amount of moisture in the soil.
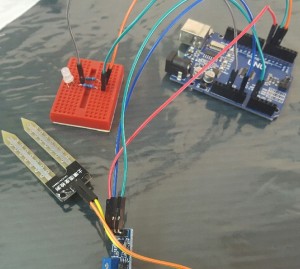
Pinout
- Arduino => Moisture Sensor
- D7 => VCC
- GND => GND
- A0 => A0
Your sensor might have 2 parts or just one. Some manufacturers fuse the ‘fork’ and the controller into one, other don’t. Anyway check your model and see if you manage to find these pins.
Grab your LED attach 1 resistor to the red pin and another to the green (we won’t be using the blue pin). Check if your LED is common anode or cathode. If common anode attach the common to 5v or 3.3v, if common cathode attach it to GND. Now I have a common anode so my code is set to work with common anode. If you have common cathode you need to find the function setLED and modify the values of the analogWrite function from example: ‘255-240‘ change it to ‘240′.
- LED Green Pin 6
- LED RED Pin 5
- LED Common if anode 5v or 3.3v or if cathode to GND
A word of Warning
The reason I put the VCC pin to the D7 on the arduino is to be able to switch on the sensor only when needed. You should be warned that the sensor will corrode over time, since it will always be in contact with moisture, and moisture will corrode the sensor. If you are familiar with electrolysis and accelerated corrosion you might already know that if you pass current through a metal and another substance like water, a chemical process will take place. I got mine to work for nearly 2 months straight, afterwards the pins corroded to the point of breakage.
The Sketch is well documented and you should be able to follow it easily. Basically I split the range of values into 5 colors from Green to Red. Green means the plant has plenty of water and red means that it’s drier than the desert. You can modify these values to suit your environment, your plant and the soil. You can post questions in the comment section and we will answer it ASAP 🙂

Grab the code from this link: Plant Monitor upload it to your arduino, build the circuit and put the ‘fork’ in the soil. Now your plant will not go thirsty anymore. Note that you need to change the values to suit your plant. I am not responsible for killing your plant due to large amounts of water or otherwise.


Cool project. I was trying this for myself, and was wondering what modifications would be needed in the code if I use seperate LED’s rather than a combined RGB LED.
Depends. How many LEDs will you be using and how would you like to use them. For example you can have 3 LEDs red yellow and green and light up the appropriate one. Or you could have 4 LEDs of the same color, light all of them when wet and start switching LEDs off as moisture level goes down.
I figured it out. The RGB Led in this project is based on an analogue value, which is how it can change colors. However, if you use separate Led’s, then since they only take digital signal (current or no current) you just need to replace the analogueWrite commands with digitalWrite.
Yes that’s right. An RGB LED is based on how much current each channel (Red, Green or Blue) gets.
Quite confused with the soil moisture sensor to use . Is HL 69 can be use with the same code and what is the difference between YL-69 and HL-69 soil misture sensor