Arduino 433Mhz RF Wireless Data Transfer
You can download our e-book ‘Learn Arduino’ from this link
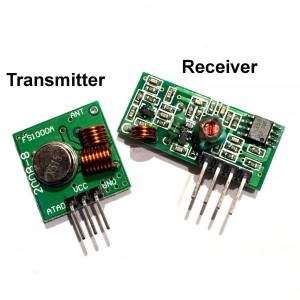
The most practical and cool way of sharing data from 1 Arduino to another is by far using a radio transmitter and receiver. The simplest form of wireless transmission (I could find) is the 433Mhz ASK modules. They come in pairs, a receiver and a transmitter. They are ridiculously cheap, selling at $1 or less a pair!!

These modules provide simplex 1 way data transmission, in order to get a 2 way communication channel is by installing 2 pairs. May I point out that these devices provide no verification of receipt. So one needs to take measures to verify successful message transmission, if that’s needed. They are great for small data transmission over small distances.
It is imperative to add an antenna to the modules. It can be attached near the marking ‘ANT’. The antenna is nothing else than a piece of wire of around 17cm in length. Alternatively, cheap helical antennas for 433Mhz are available for sale like the one shown below. An antenna may increase the transmission distance from a few cm to a couple of meters (I tested and got a fair quality from around 10 meters)

The transmitter operates at voltages between 3.3v and 12v (but check with your supplier), the higher the voltage the better the range. The pin out is as follows
- Arduino –> Transmitter
- +5v –> VCC
- GND –> GND
- D12 –> DATA
The receiver operates at 5v only. I tried it with 3.3v but did not work. The receiver has 4 pins, 2 of them are labelled as DATA , you need to use only one, either or.
- Arduino –> Receiver
- +5v –> VCC
- GND –> GND
- D11 –> DATA
The DATA pin can be attached to any digital pin on both modules.
In my opinion, the best most robust Arduino library for Radio communication is the Radio Head library. I used Virtual Wire for some time but I had intermittent issues when using this library. It is also an old one as well. Radio Head on the other hand is well documented, periodically updated and supports multiple protocols and devices. You can download the library here. Follow the instruction to install a library in this post, if you find any difficulties.
The following is an example for sending the temperature from one Arduino to another by means of radio communication over 433Mhz band.
Prerequisites
The Transmitter
#include<RH_ASK.h>//including the library #include<SPI.h>// this is not used but needed to compile //So arguments are bitrate, transmit pin (tx), //receive pin (rx), ppt pin, isInverse. The last 2 are not used. RH_ASK driver(2000, 11, 12, 10, false); void setup() { Serial.begin(9600); // Debugging only if (!driver.init()) Serial.println("init failed"); } void loop() { const char *msg = "Hello from RuntimeProjects.com"; driver.send((uint8_t *)msg, strlen(msg)); //converting char array *msg to uint8_t and handing it over to the module to be sent driver.waitPacketSent(); //halt execution until all data has been sent delay(2000); //wait 2 seconds }
The Receiver
#include<RH_ASK.h>//including the library #include<SPI.h>// this is not used but needed to compile //So arguments are bitrate, transmit pin (tx), //receive pin (rx), ppt pin, isInverse. The last 2 are not used. RH_ASK driver(2000, 11, 12, 10, false); void setup() { Serial.begin(9600); // Debugging only if (!driver.init()) Serial.println("init failed"); } void loop() { uint8_t buf[RH_ASK_MAX_MESSAGE_LEN]; //this is the buffer we use to save the received data uint8_t buflen = sizeof(buf); // if (driver.recv(buf, &buflen)) // Non-blocking { int i; // Message with a good checksum received, dump it. driver.printBuffer("Got:", buf, buflen); } }
This example transmitter will send “Hello from RuntimeProjects.com” to the receiver. The receiver will output the data received over serial.
Ask questions in the comments section.
Happy Building 🙂


[* Shield plugin marked this comment as “spam”. Reason: Failed GASP Bot Filter Test (checkbox) *]
i am using rf 433 mhz and they are working, i checked from another code. br Ok at reciever, data pin of rf is attached to pin no. 11 of arduino? Is it right?
You have an error description parameter order (in comments)
Great! How do I use the data coming out of the receiver? Say I send “A” over the link, and I want the Arduino on the other end to recognize that when it gets “A” it should run the code to blink an LED, whereas if it gets “B” it should fade the LED instead. How do I do that?
Hi,
Thanks for the great post, it will help starters who want to move out of virtualwire for variety of reasons. I was reading your code and what looks to me is that the arguments to the driver init should be in the order of bitrate,Rx,Tx,ppt_pin,isinverse. From your code I see that the Tx,Rx pins are in the wrong order. Just a typo but someone new to this might crack his head to figure out why its not working 🙂
Code snippet from your post above
//So arguments are bitrate, transmit pin (tx),
//receive pin (rx), ppt pin, isInverse. The last 2 are not used.
RH_ASK driver(2000, 11, 12, 10, false);
Might use this for a project I’m doing, there are however pretty strict size requirements for the transmitter portion. Do you have the physical dimensions of one of these?